Leading up to Christmas last year my eldest daughter was putting together her wish list and asking me if I could get her a bluetooth speaker system. Looking at the prices and the quality of the devices she was suggesting I said I bet I could make something much better for a similar amount of money to which she happily agreed. I’d inadvertently sign myself up to building her a speaker system for Christmas and to be fair on her younger sister, I needed to make two.
Design Choices
At the outset she expressed a desire for the system to support the same functionality as the device she was initially wanting me to buy. That mean’t blue tooth connectivity with volume, play / pause, track forward and track previous functionality. All those features are easily supported with the RN52 bluetooth audio module from Microchip, however, as the device is of small form factor and pin pitch of 1.2mm, it is not well suited to hand soldering. Typically it would be soldered on a surface mount PCB using pick and place robots and a soldering oven which is certainly something not available to me. Fortunately though, a hobbyist electronics outfit called Sparkfun sells a break out board which brings all the device pins out onto a 0.1inch pitch hand solderable board. Problem solved for the bluetooth connectivity.
Next comes the speaker choices. To keep costs to a minimum I made a decision early on to only look at full range drivers to eliminate the added complexity of crossovers and extra amplifier modules. Looking through the catalogue of available devices available at Parts Express I quickly found out that there is a huge range of possibilities of varying quality. Ultimately my aim was to build a system that has passable high frequency performance but with a better than average bass response to make it a stand out in comparison to the systems my daughter was looking at, systems which were costing around $200-$300. Because of the manufacturers reputation, my previous experience with the quality of there drivers and the manufacturers measured response I settled upon a peerless-830987 3 inch anodised aluminium full range driver.
Again to keep costs to a minimum, for the choice of amplification I restricted myself to a range of pre-assembled amplifier modules with power outputs in the range of 10-20 Watts per channel. For this task I settled upon the Sure Electronics AA-AB32155 amplifier module that delivers 15 Watts per channel into a 4 Ohm load. The whole system would be powered by a laptop style switch mode power supply module.
Cabinet design
I wanted to obtain the best possible bass extension from the driver in a box of relatively small volume. Naturally I chose a vented enclosure as this would enable me to obtain a useful response below 80Hz. Doing some manual iterative vented enclosure designing using R scripts based on those I used in developing my full range monitors, I settled upon a box volume of 3 litres and a box frequency of 65Hz. This combination gives a relatively flat bass response that is -3dB down at a quite remarkable 54Hz. The modeled response is shown below.
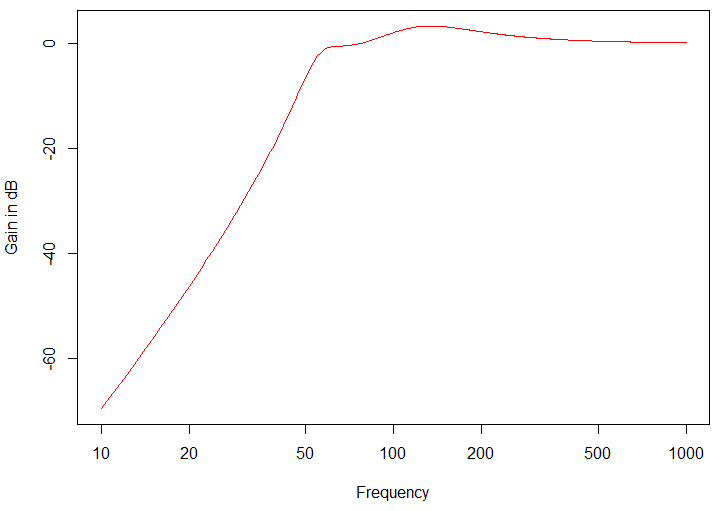
Modeled Woofer Frequency Response
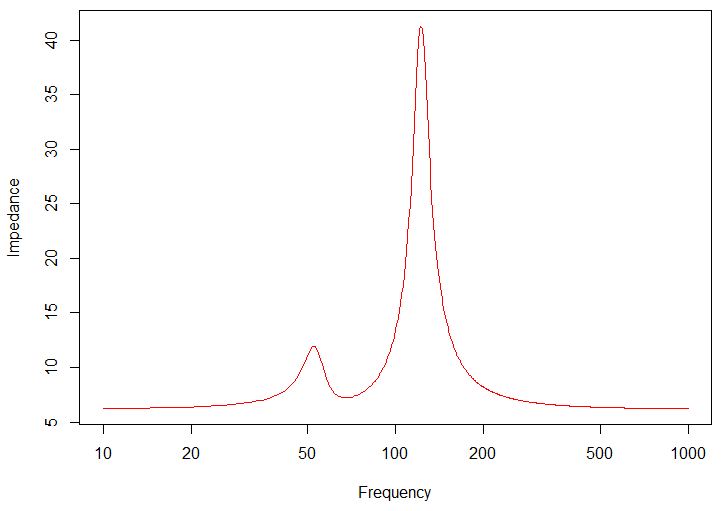
Modeled Woofer Impedance
Although the response is not maximally flat it only has a modest positive deviation of +2dB at around 120Hz. Whatever design parameters we choose we cannot remove this deviation as it results from the driver having a high Qt of 0.94. I reasoned that whilst it will introduce a bass colouration, the degree is modest and likely to be welcomed by my daughter as “louder bass”.
Driver Testing
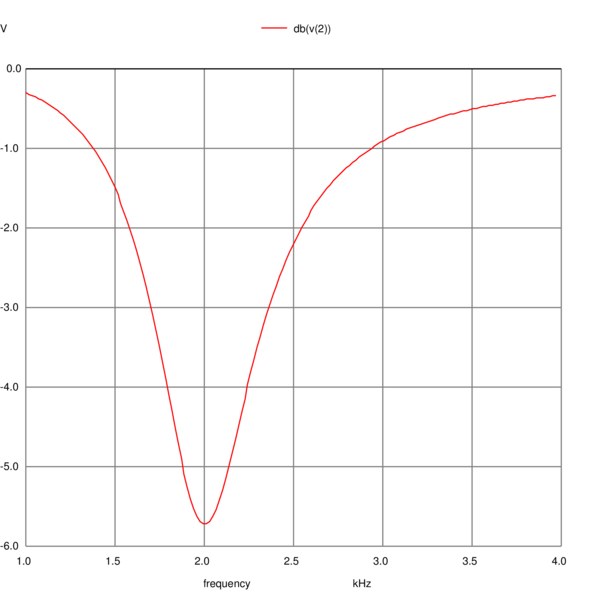
Before embarking upon building the speaker cabinet proper I wanted to test the design and have a means of easily testing the audible performance of different left-right driver separation and angles so I built two 3 litre enclosures with the correct box tuning. These cabinets did indeed confirm the bass extension of the drivers which we found remarkable given there size, however, I could readily hear a mid-range stridency at around 2kHz which my ears found distressing to listen to. Close inspection of the manufacturers measure response confirms the stridency in that region as can be seen below.

Peerless 830987 Driver Response
Although my daughters didn’t comment on it, I certainly quickly came to the conclusion that to obtain the best possible performance from these good drivers I would need to equalise this stridency out. Going from the manufacturers measured response graph and listening tests using the test cabinets and amplifier module being driven by Har-Bal and some heavy rock / grunge music, I came to the conclusion that I needed a notch filter with a centre frequency of 2kHz, a Q of 5 and an attenuation of -6dB. Listening to a filter of those characteristics realised through Har-Bal confirmed it to be sonically pleasing and the best possible balance for a single notch response filter.
In terms of driver arrangements, I came to the conclusion that the most satifying sound for a combined system whereby both drivers share the one physical cabinet was to have them angled outward. By doing so the interference pattern between the drivers would be reduced and the room reflected sound would have a definite stereo aspect to it, more-so than if the drivers shared the same plane baffle.
Required Electronics
To obtain the desired performance we need to equalise the driver. As neither the RN52 or the amplifier module have that capability we need to realise it with extra electronics. Ideally, to keep added noise to a minimum it would have been great to be able to realise it with digital filter but that would add both expense and complexity to the small scale project so my only alternative is analog electronics. This is easily realised with a potential divider circuit in which the grounding arm is a series LCR circuit with the L / inductor component realised using a gyrator circuit (active electronics that makes a capacitor look like and inductor). The NGSPICE simulated response of the EQ is show below.
Simulated Equaliser Response
We also need a regulated 3.3 volt supply to power the bluetooth receiver electronics and to improve the utility of the device I also decided to add a 5 volt supply powering a USB port for use exclusively as a charging / powering port for hand held devices / tablets etc. The 5 volt supply would also provide a bias level for the analog electronics which would be powered off the 12 volt supply supplying the amplifier module.
The other aspect I discovered on the run was that I would need a differential to single-ended amplifier to interface the RN52 to the analog electronics. Initially I was thinking I could use it single-ended but this has two complications. Firstly, the RN52 ground is heavily contaminated with digital noise so trying to run it single ended results in quite audible digital noise contamination. Secondly, when the RN52 goes for sleep state to pairable and from paired to connected the DC output level from the output line goes from 0 to 1.7 volts or so which results in a massive glitch coming from the speakers. The only way of avoiding this is by using the differential outputs and converting them to single ended for the sake of the remaining analog electronics.
The electronics design I came up with is shown below. Although it shows a de-click circuit for the loudspeaker I ultimately didn’t include it as I found the level of turn-on click delivered to the speakers was too small to justify the added complexity.
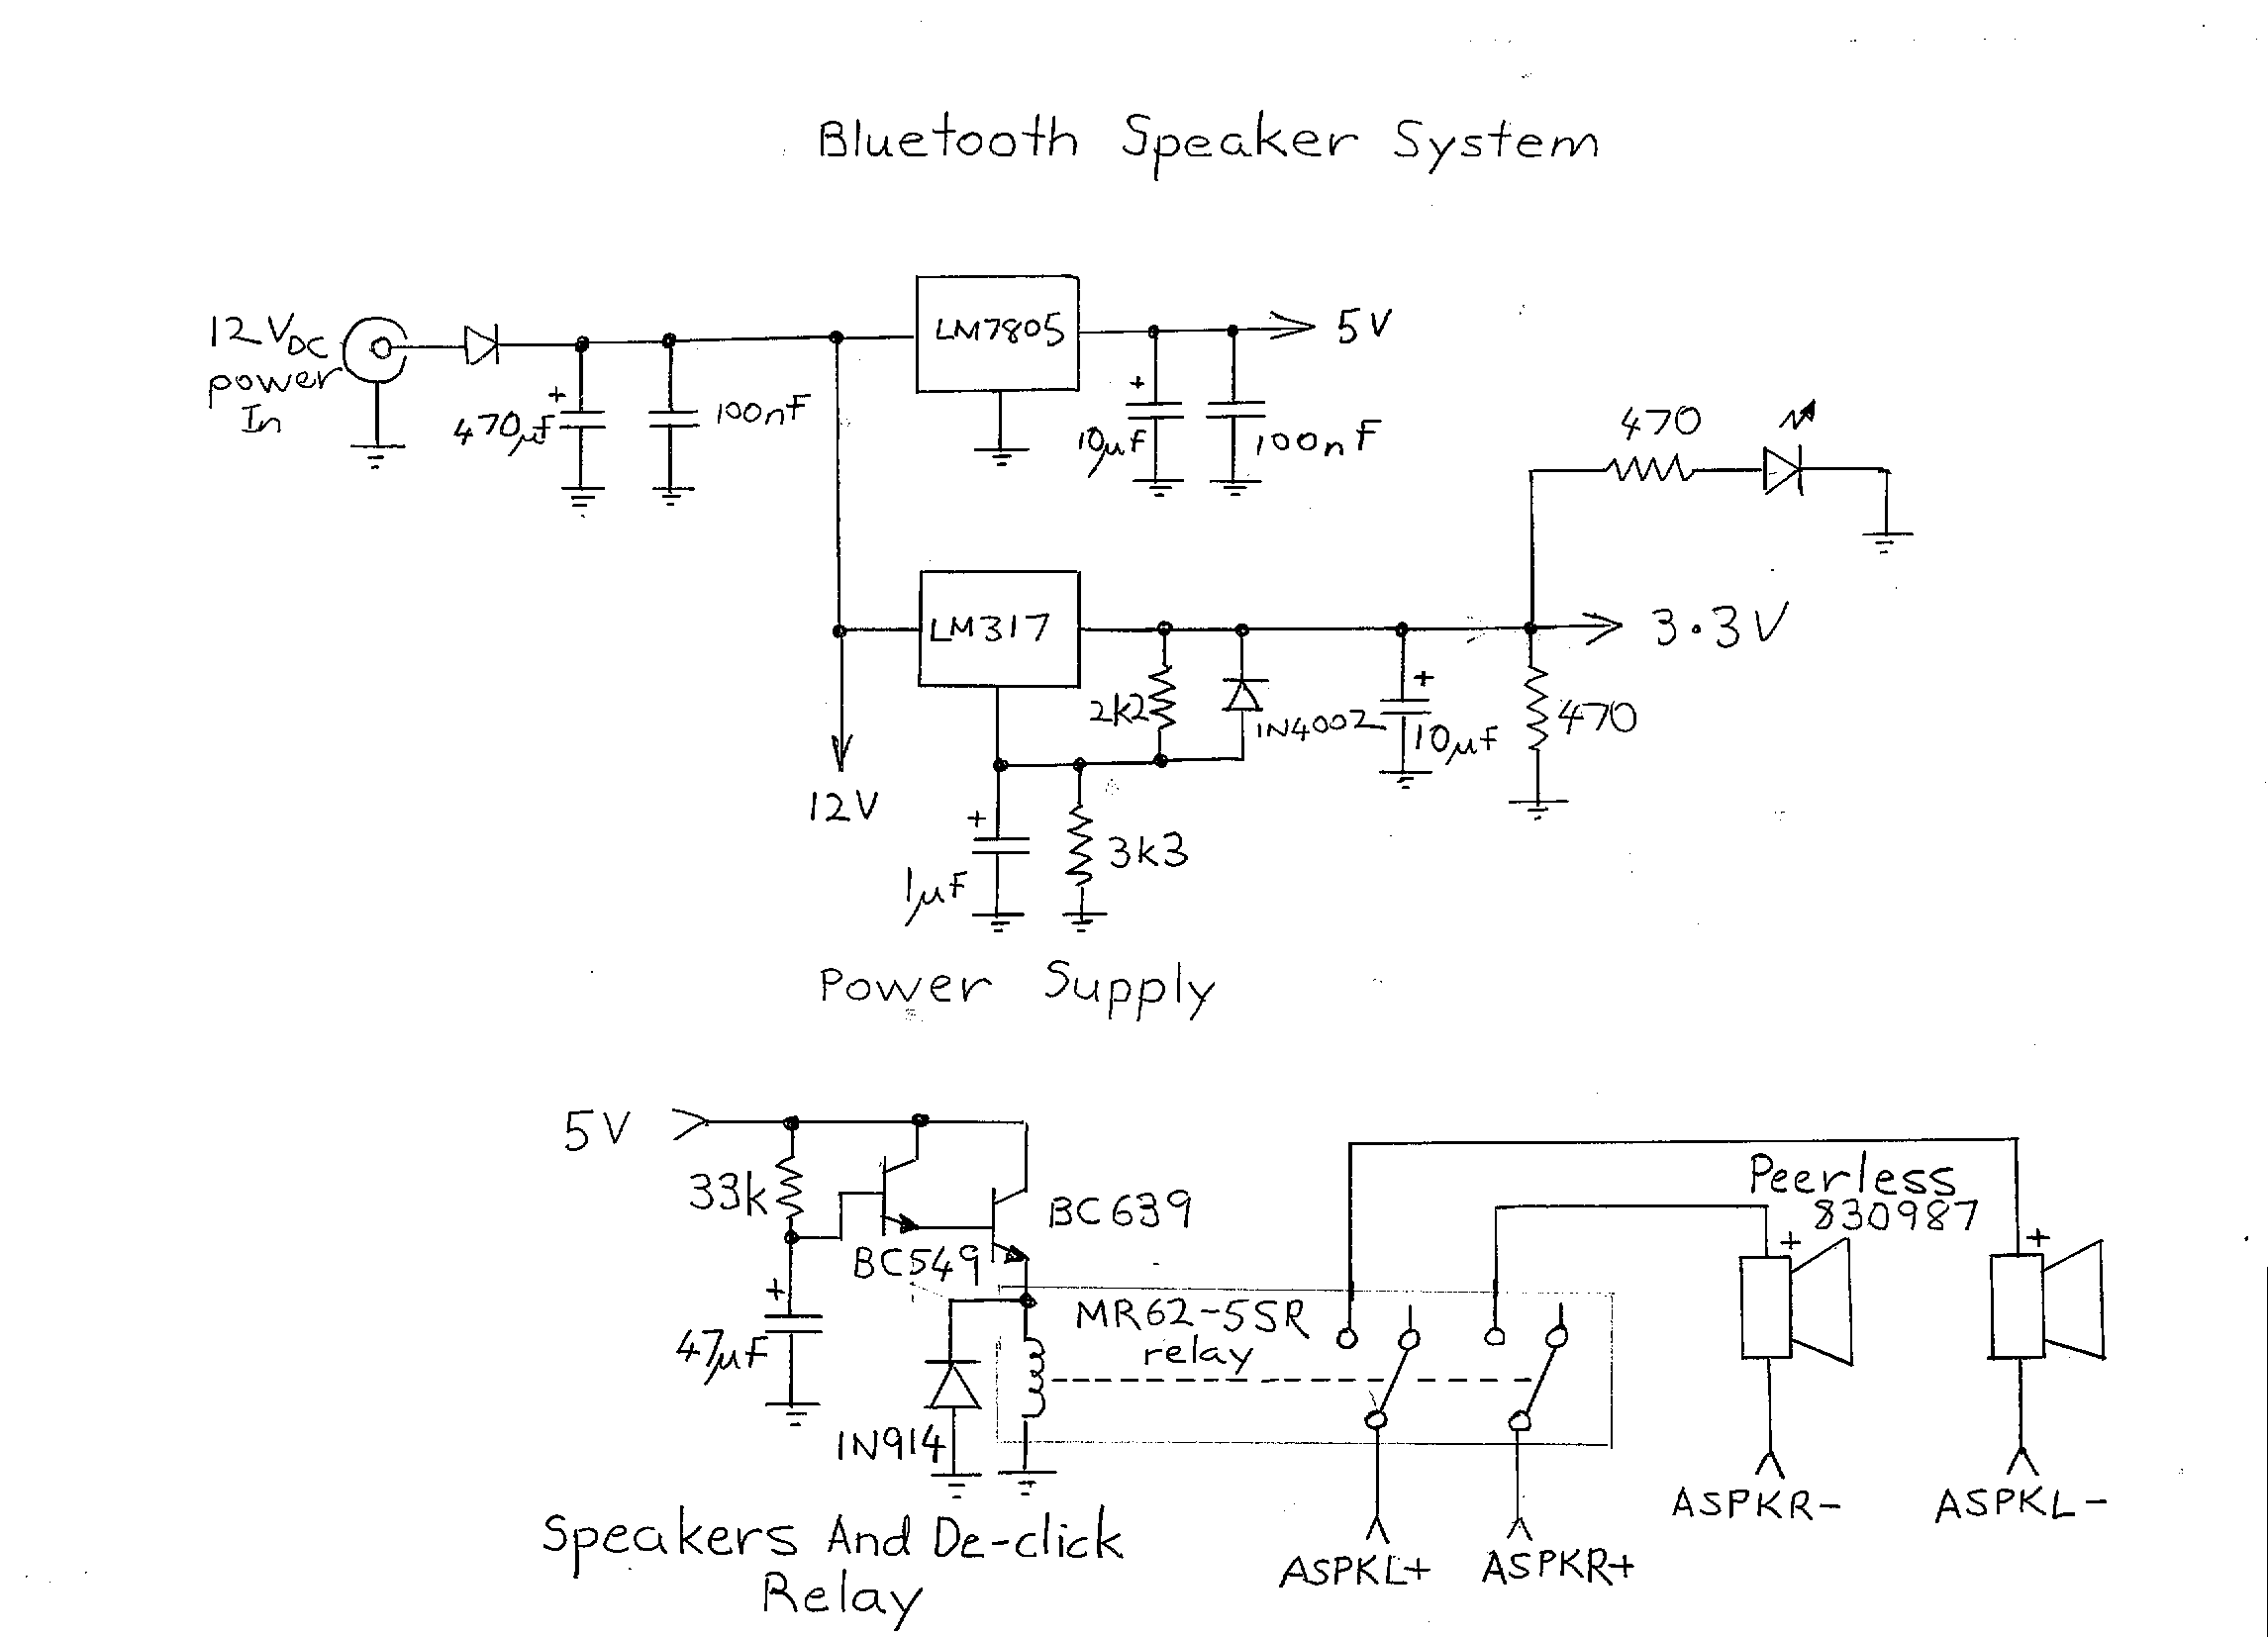
Power supply
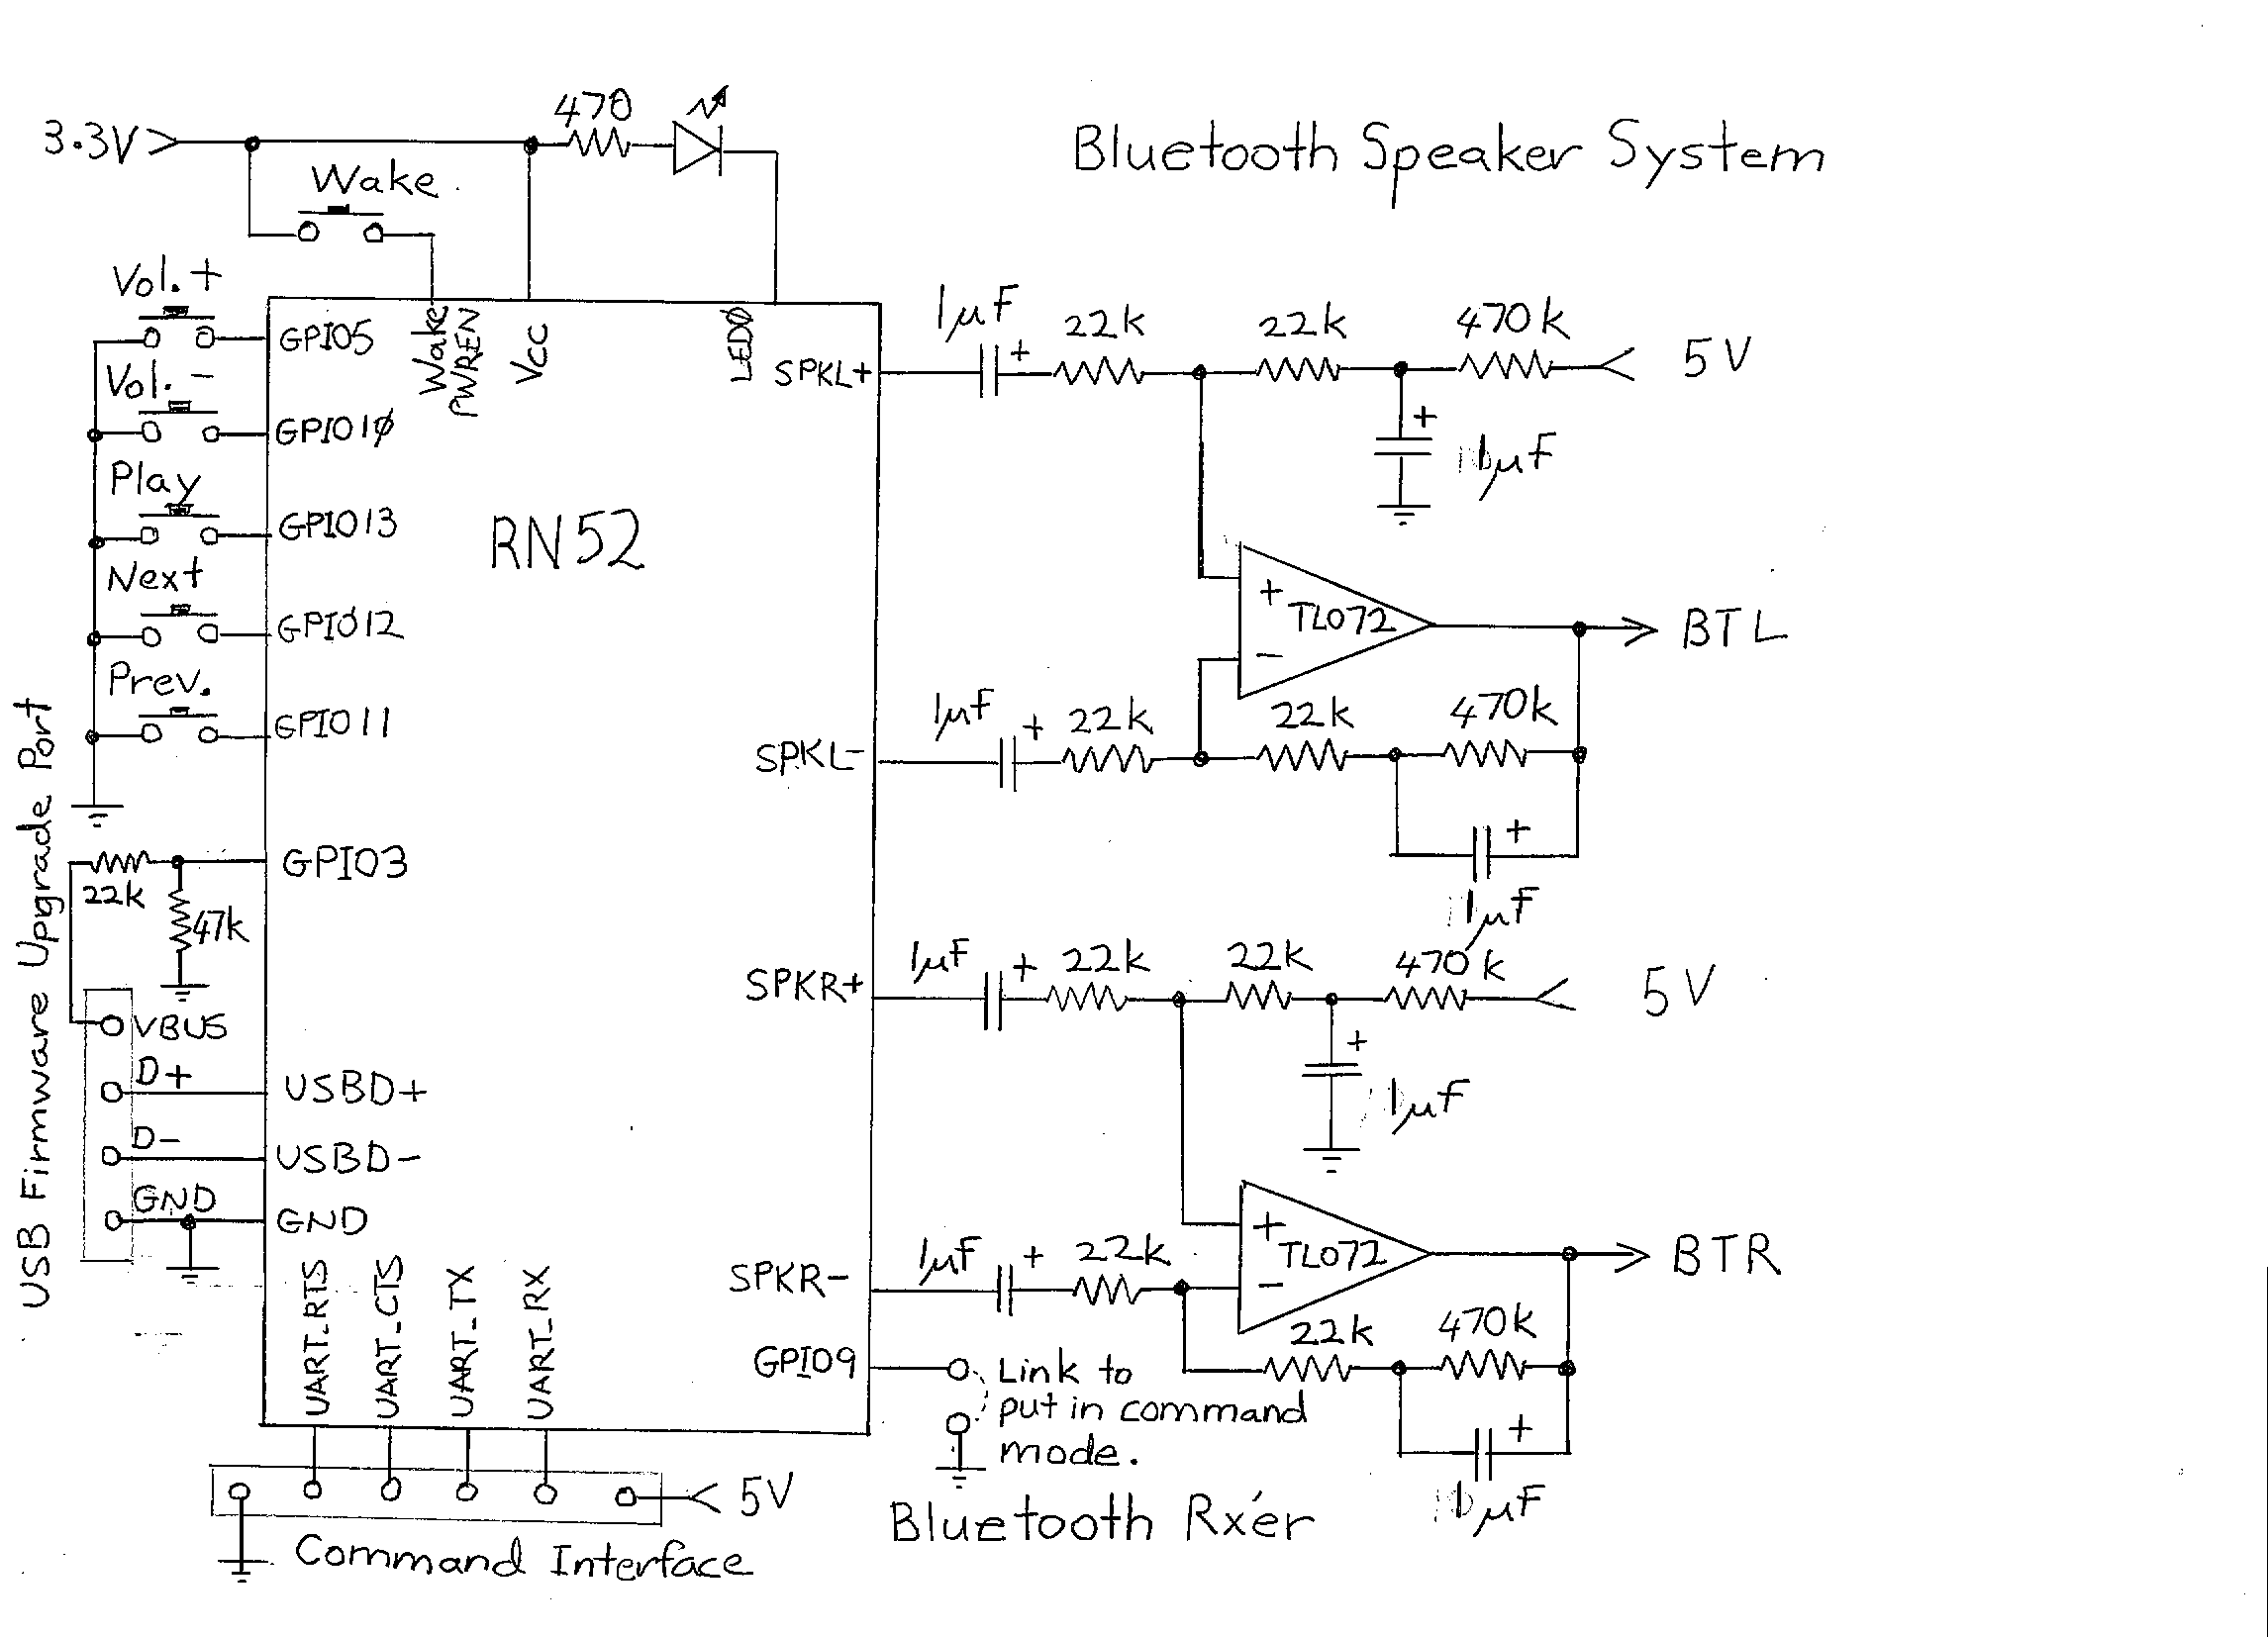
Bluetooth Module Rx’er
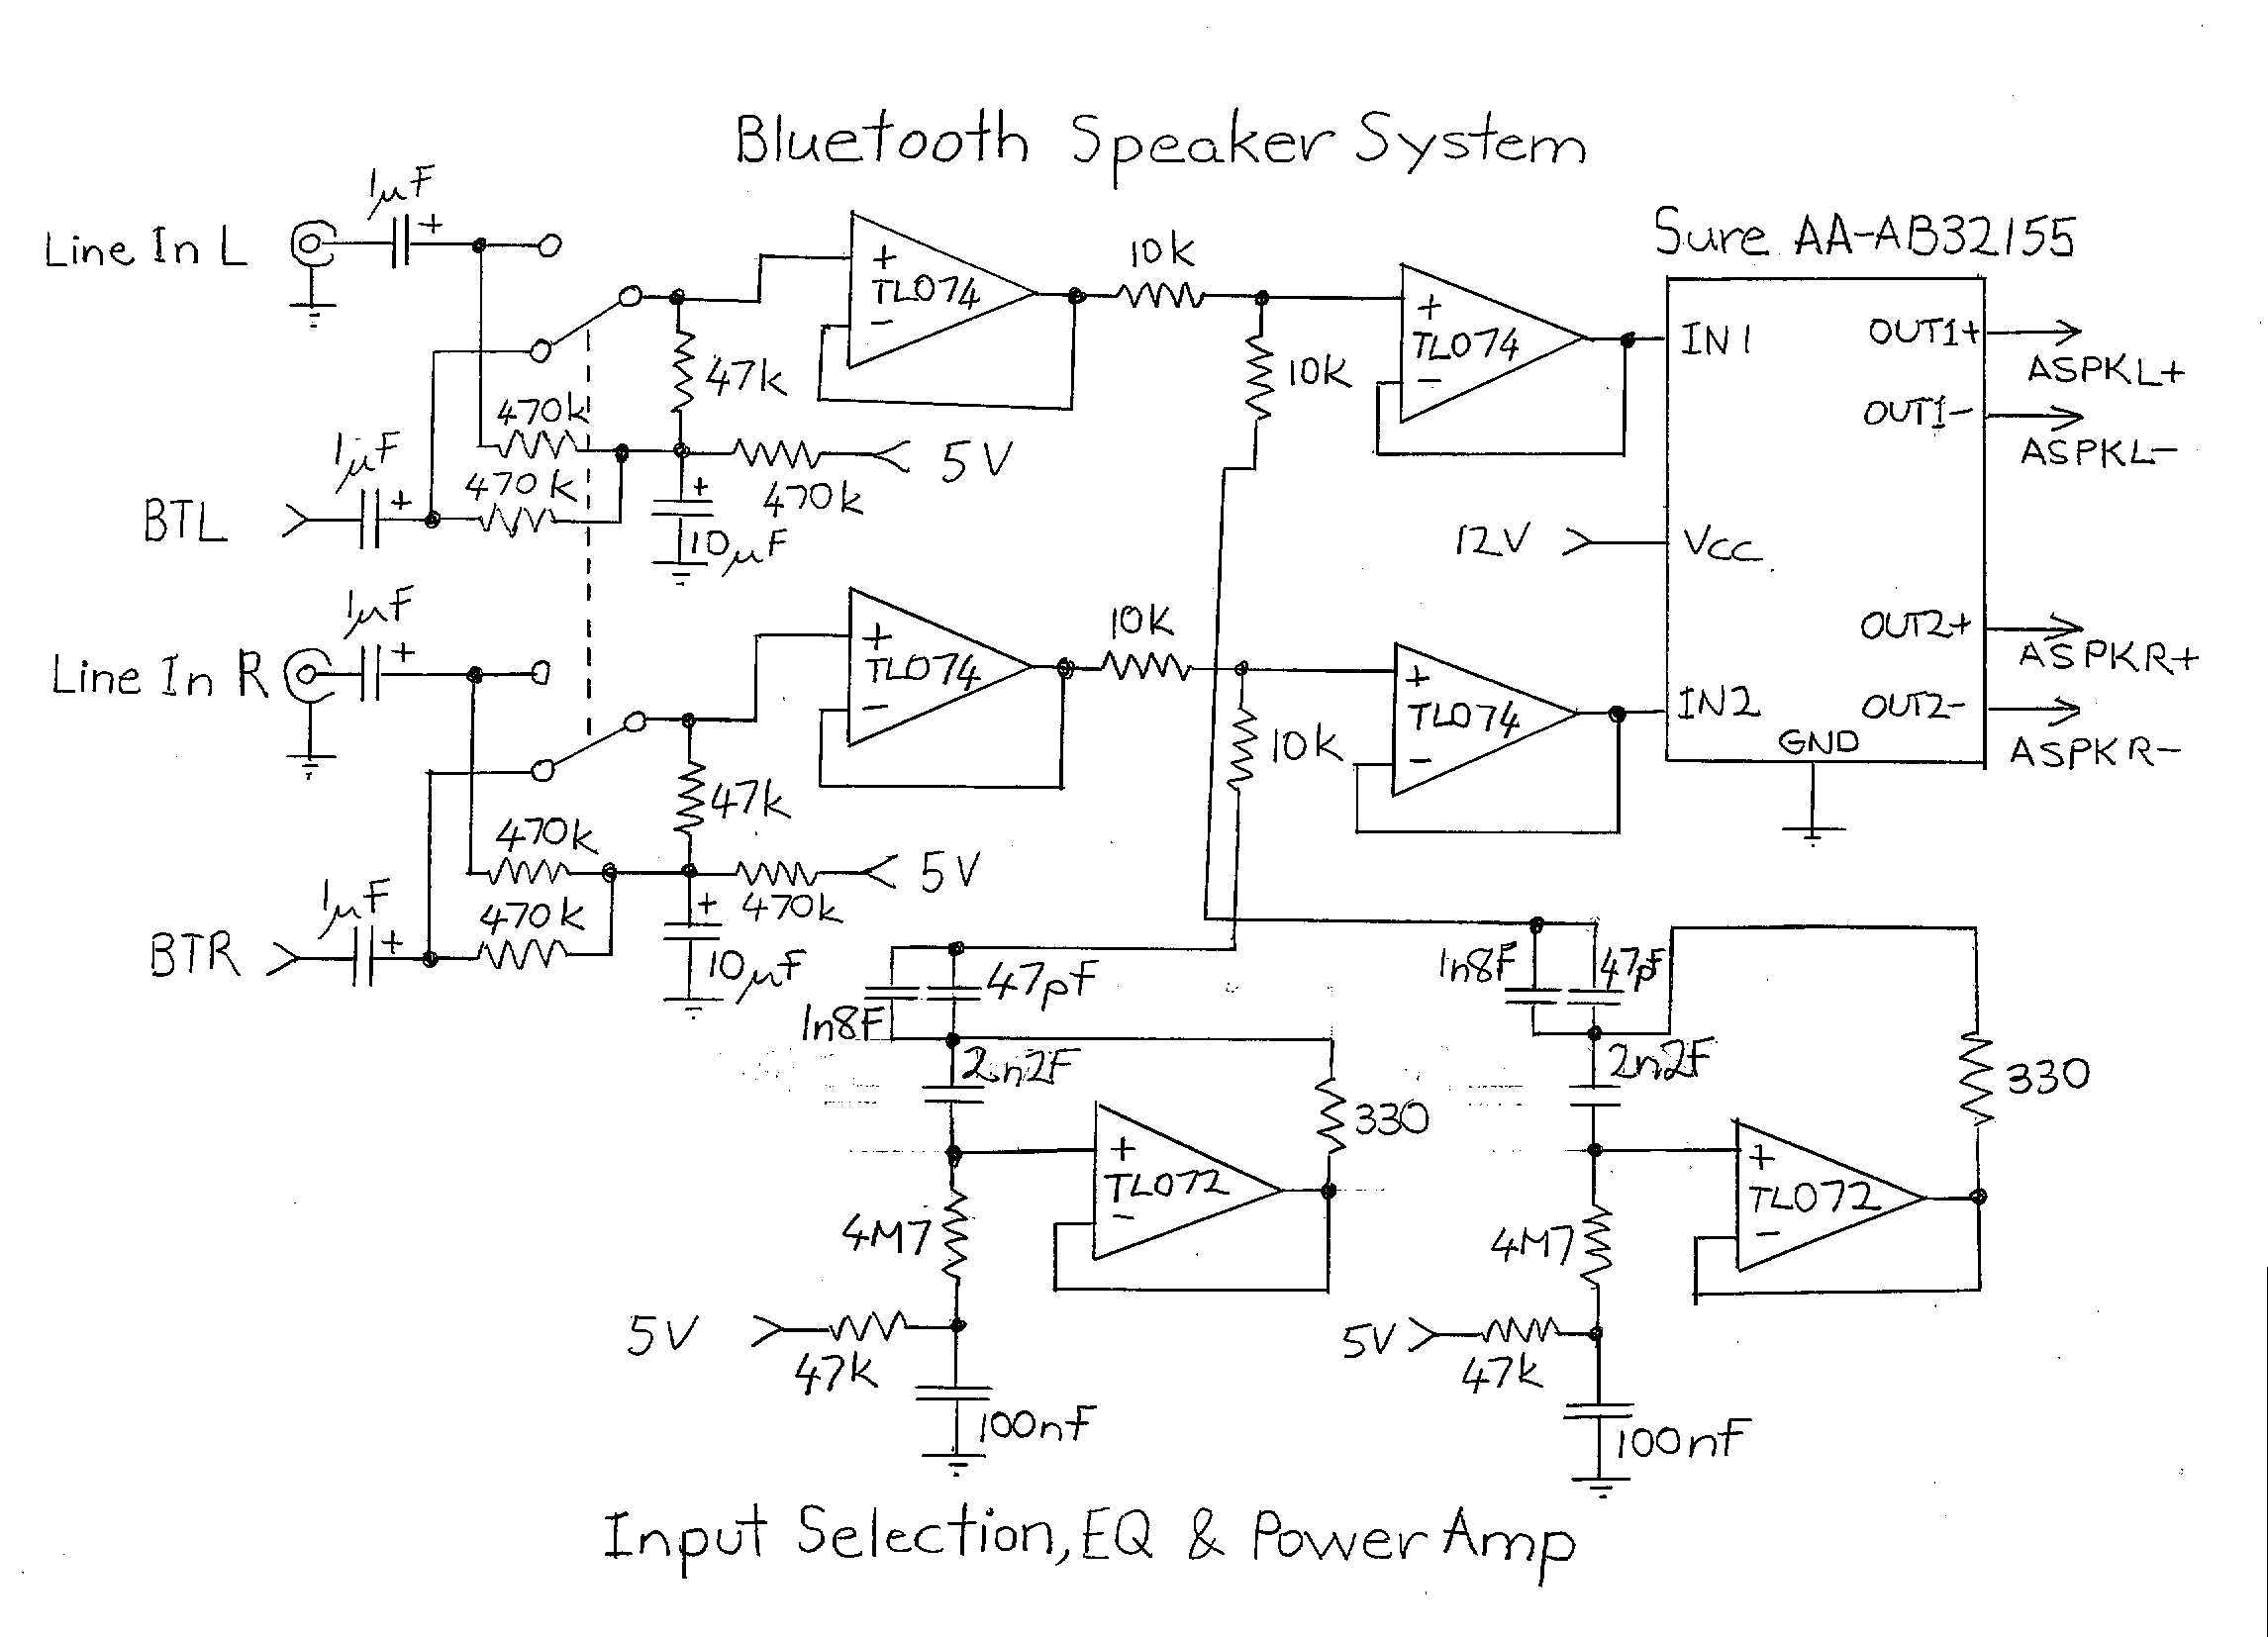
Input Selection, Equaliser and Power Amp
Other Challenges
I had quite ambitious goals in making interesting and stylistic cabinets for these two bluetooth speakers (one for each daughter). Most problematic being the use of angles other than right angles. Anyone with any woodworking experience will readily tell you how much more complicated everything gets when you are no longer working in right angles exclusively. That and doing things by the seat of my pants really did push my capabilities to their current limits.
Even after completing the basic cabinets I didn’t have a clear idea of how I was going to be incorporating the electronics nor if I’d have enough space to fit it all in. I knew how big the amp module was, how big my switch panel was going to be, but beyond that it was just working it out as you go, which in hindsight is probably not the best way to handle it. I did attempt to figure out the dimension of the top and bottom cabinet pieces via plans but on finding that they didn’t work (ie. were wrong) I just winged it by eye from the other cut pieces and dispensed with the plans.
The electronics too posed a number of challenges along the way. The first being the LM317 not regulating the 3.3volts required which, as I found out, was because it has a minimum load requirement that I wasn’t satisfying. Following that issue I discovered that using the output of the RN52 single ended was not going to fly, the output level was too low and the bluetooth control buttons weren’t functioning. The later points I discovered were fixable by customising the RN52 which is done through programming it via commands issued through a serial interface. To be able to do that I need to construct a TTL to RS232 level converter so I could program it with my laptop, although it didn’t end there. When attempting to program it I discovered it didn’t support the functionality the documentation said it would. Why? Because the firmware was out of date. Then I had to construct the DFU interface and download and flash the most up to date firmware for the device so that it finally it supported what it said it would.
Finally, apart from a number of missed steps in incorrect wiring, I had major issues solving ground noise problems which I never did completely find an answer to. Ground noise issues can be extremely mysterious and this was no exception. I managed to fix the bluetooth path so it only had a minor mains hum but intriguingly when connecting a double insulated CD player to the line input it immediately gave a loud mains hum and plugging in a iPod mini would produce the same hum if you touched the device. The odd thing about the whole behaviour was that if I grounded it to my Oscilloscope (which is connected to mains earth) all the ground noise problems would disappear. As I don’t have a great ideal of why the floating ground is causing these issues I just hacked a solution by providing a mains earth thus converting the floating earth – double insulated power supply into a mains earthed (but still double insulated) one. Looks weird but it works a treat.
Assembly Photos

Cabinet from the front with Speakers in place and Covers removed but no Electronics.

Cabinet from the rear showing the Electronics Bay.
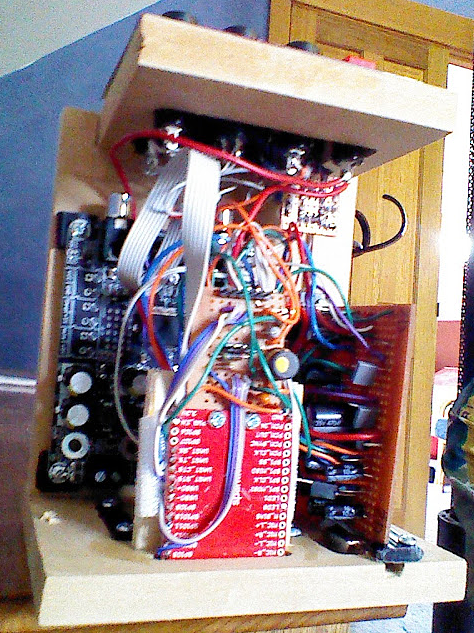
Electronics Carriage which slides into the Electronics Bay.
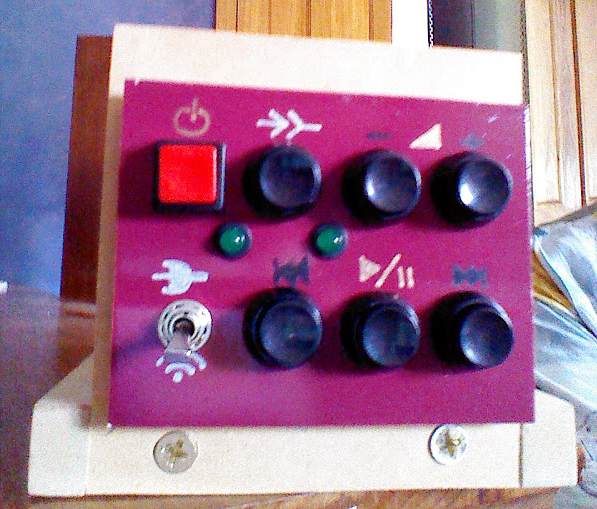
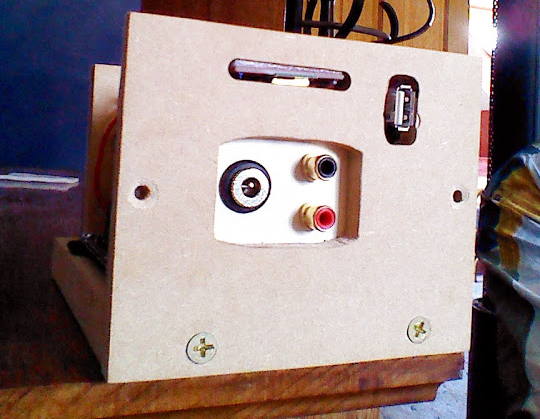
Electronics carriage front panel.
Electronics carriage rear panel.

Completed and Assembled Speaker System.
The Proof in the Pudding
Ultimately the question comes as to how well do they perform. Honestly, I was completely gobsmacked as to how good they sound! So much so that when I finally completed one and got to listen to it at around 11:00 at night I spend the next two hours listening to everything and anything I could find. More than anything else, the bass extension just surprises me, that and the tightness of it. The clarity of the mid-range is exceptional and in perfect balance with the bass and although the top end is not perfect the nature of the colouration is such that you don’t really register it as a problem. If anything, it gives an exaggerated presence to transient material. I am so pleased with the way they sound I’d like to keep one for myself but alas, I can’t, because they are now my daughters speakers and I’m too tired from the experience to want to build another one right now. Maybe some day in the future but not now! I’ll just borrow one of there’s. Seriously, if I had to put a dollar value on how they sound I’d be thinking something around the $800 mark or so. They certainly blow anything in the $300 market out of the water no holes barred. The angled arrangement of the drivers really works well too, giving a surprisingly good sense of stereo from drivers close together and interestingly enough, I find the most pleasant sound is to be found off axis on either side. Whilst the centre line provides a fine performance there is audible interference happening which you just don’t hear slightly off axis (15 degrees or so). I really love these!
On a closing comment after many more hours of listening to them I’d would add that these speakers are more “modern popular music” friendly than my reference monitors. Many recordings these days being recorded in home studios often have an overbearing bass end brought about by mixing and mastering on small speakers with a limited low end output. It just so happens that the bass response of these speakers actually matches the “average” home studio monitor pretty well so consequently they are much more compatible with these recordings than my monitors. These make what I can’t bear listening too on my monitors perfectly listenable and the key reason I’d love to keep one for myself!