| Har-Bal Synthetic Space |
|
Har-Bal™ new thinking, new directions... Welcome to Har-Bal Synthetic Space, the plugin software that introduces a new approach to reverberation synthesis. Manual
Introducing the ModelSynthetic Space began as an idea after having read a exceptionally well written article on building acoustics. The article (Auditorium Acoustics 101) made plain the essential elements of good room acoustics (anyone interested should definitely read it). From that It became clear to me that the ideas conveyed therein could equally well be applied to the synthesis of virtual spaces and hence reverberation processing. Har-Bal Synthetic Space is the distillation of those ideas into a functional plugin format. The key points are as follows. Signal to Noise RatioAny sound that detracts from the performer being listened to is regarded as noise. This could be environmental, electrical or reverberation based. Reverberation constitutes a noise source because it reduces the intelligibility of the performer. In a music recording the environmental noise and electrical noise sources will typically be very low but reverberation may not be. An idea level of signal to noise ratio for room acoustics is between 15 and 20dB (the reverberation level is 15 to 20dB below the direct arrival of the performers sound). Early ReflectionsAny reflected sound that arrives within the Haas zone (no more than about 70 milliseconds after the direct sound arrival) is perceived as being part of the performers sound and not an echo of it. As a consequence, early reflections do not reduce the signal to noise ratio. Put another way, you can have a lot of early reflections and generally not affect the intelligibility of the sound, although high levels can result in colouration. Late ReflectionsLate reflections are heard as an echo. If the reflected sound arrives later than 70 milliseconds after the performers direct sound but earlier than 250 milliseconds after, that reflected sound can cause confusion to the listener and severvely affect intelligility. Therefore, for a good sounding acoustic space late reflections should be supressed as much as possible. Reverberant TailIdeally the reverberant tail should begin around 250 milliseconds after the direct path of the performers sound and the reverberation should be diffuse (perceived as comming from all directions and spread out in time). As long as the reverberation is not heard as discrete echos, it will add a sense of physical space to the performance and not distract from the listening experience. The ModelRather than attempt to model a real space, Synthetic Space is built on the notion of a simplified but idealized one. That space comprises a signal source, the performer, who is standing on stage a fixed distance away from the rear stage wall which is an idealized diffuser. The listener is in the middle of the open space between the rear stage wall and the far wall of the auditorium. The early reflections occur after a fixed time delay which is the time it takes for the sound to travel twice the distance between the performer and the rear stage wall. This distance is referred to as the Stage Depth. The time taken for the reverberation tail to begin is assumed to be the time taken for the sound to reflect off the auditorium wall back to the listener. Because the listener is in the middle of the room, this is the same as the time it takes for the sound to travel a distance equal to the Auditorium Depth, or the distance from one wall to the other. The idealised case of early reflections no later than 70 milliseconds and reverberant tail starting at 250 milliseconds corresponds to an Auditorium Depth of around 83 metres. For spaces larger or smaller than that these time limits scale proportionately. As such, smaller spaces (less than 83 metres depth) have the reverberation tail starting too early, and larger spaces have the early reflections continuing into the late zone. The model is implemented in this way to reflect the reality that the space you might want to realise is a real one of a given size rather than an ideal one, and ideal real spaces generally must be of a certain size to be constructed as such. The basic model idea is illustrated below. 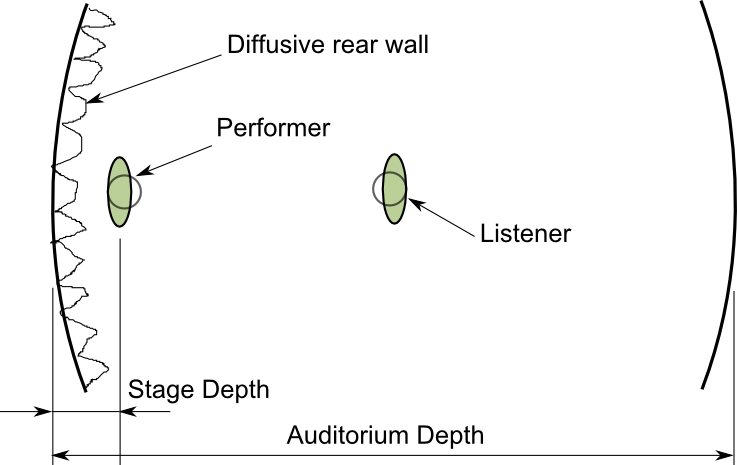
The Simplified Acoustic Space that Synthetic Space ModelsAlthough late reflections are considered bad and it is possible to realise an indealised model that has perfect suppression of late reflections, it was found through many listening tests that the complete absence of late reflections (particularly with larger spaces) sounded unatural as the reverberation tail sounded disconnected from the sound source creating it. This was particularly true for strongly percussive sounds like drums and the like. To avoid this issue late reflections have been built into the model, albeit at a lower level to avoid significant intelligibility issues. This can be seen in the typical impulse response of a Synthetic Space as shown below. 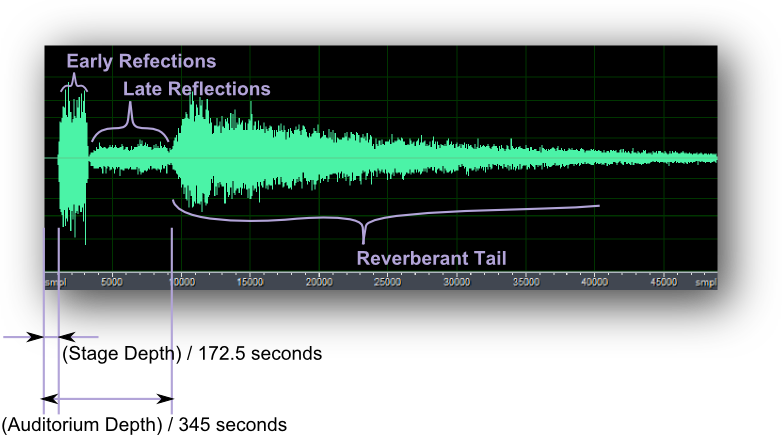
A Typical Synthetic Space Impulse ResponseContrast this construction of reverbation to a more typical synthesised one and some differences become apparent. Below for example, is a comparison of Har-Bal Synthetic Space and Sonitus Reverb impulse responses for similar sized spaces. It is clear that Sonitus Reverb does not have a region of late reflection supression and not much initial delay. It seems that it is essentially just realising the reverberant tail part of a room response. On its own and in this configuration this reverb would not have the required auditory cues to convey the size of the space as the size of a space is conveyed by the delay between direct arrival of sound and the beginning of the reverberant tail and this impulse response does not have that delay present. This may explain why reverb processors are commonly used in a chorus-delay-reverb triplet configuration. The chorus effect provides the early reflections, the delay the spatial cue of the size of the room, and the reverb the reverberant tail. With Har-Bal Synthetic Space such a triplet is not required as it is built into the model itself. In fact, adding those parts would most likely ruin the synthesis. 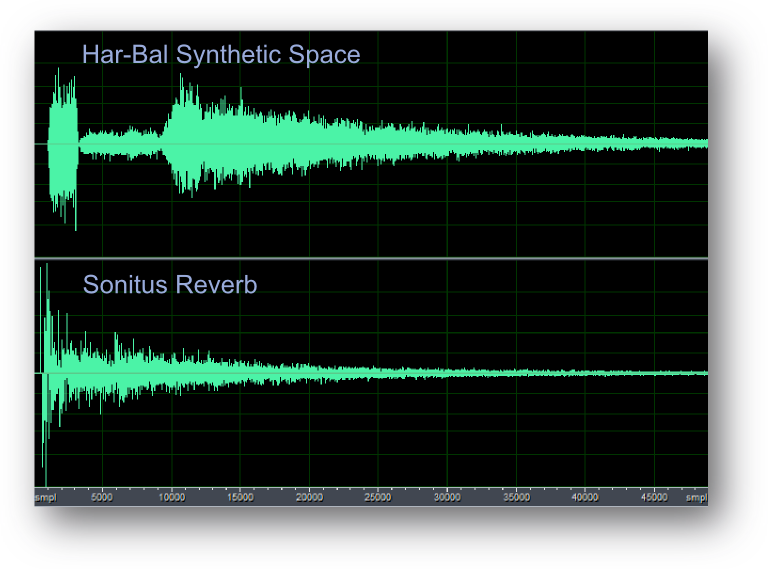
A Comparison of Har-Bal Synthetic Space and Sonitus ReverbAnother point to note is the complexity of the room response that Har-Bal Synthetic Space realises. Zooming in on the early time region of this impulse response makes this difference apparent. In the case of Har-Bal Synthetic Space, the impulse response looks like a continuous noise like impulse response, whereas in the case of Sonitus Reverb it appears as a set of discrete reflections with silence inbetween. The continuous nature of these early reflections in Har-Bal Synthetic Space makes for a high level of apparent diffusion and the greater diffusion means the reverberation has less information in it to distract from the comprehension of the performer being listened to. In short it will have better intelligibility. 
A Comparison of Har-Bal Synthetic Space and Sonitus Reverb - Zoomed In ViewHar-Bal Synthetic Space is a stereo reverb that synthesises a three dimensonal reverberation. For stereo input material stereo is first converted to mono to ensure an even balance of left an right reverberation. The mono signal drives two uniquely seeded finite impulse response filters (FIR) that create the dense early reflections required for good diffusion. The outputs of both then drive independent and unique late reflection processors which finally drive the reverb tail processor. This component has left to right and right to left cross coupling to simulate sound bouncing around the auditorium. This structure is illustrated in the figure below. 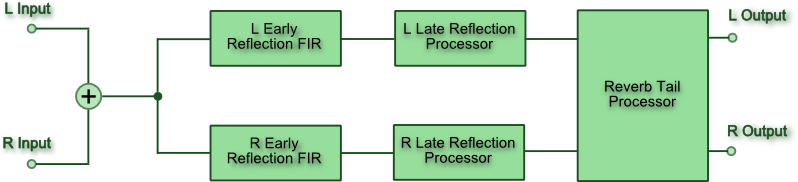
The Processing Structure of Har-Bal Synthetic SpaceDownloading and InstallingTo download the software after purchase go to the Har-Bal downloads page and log in using the Customer Name and Order Number as it appears on your purchase invoice as shown below. You should save this information in a safe place (the Customer Name and Order Number) as you can use it at any time to download your software and will need it to create new license keys when needed. 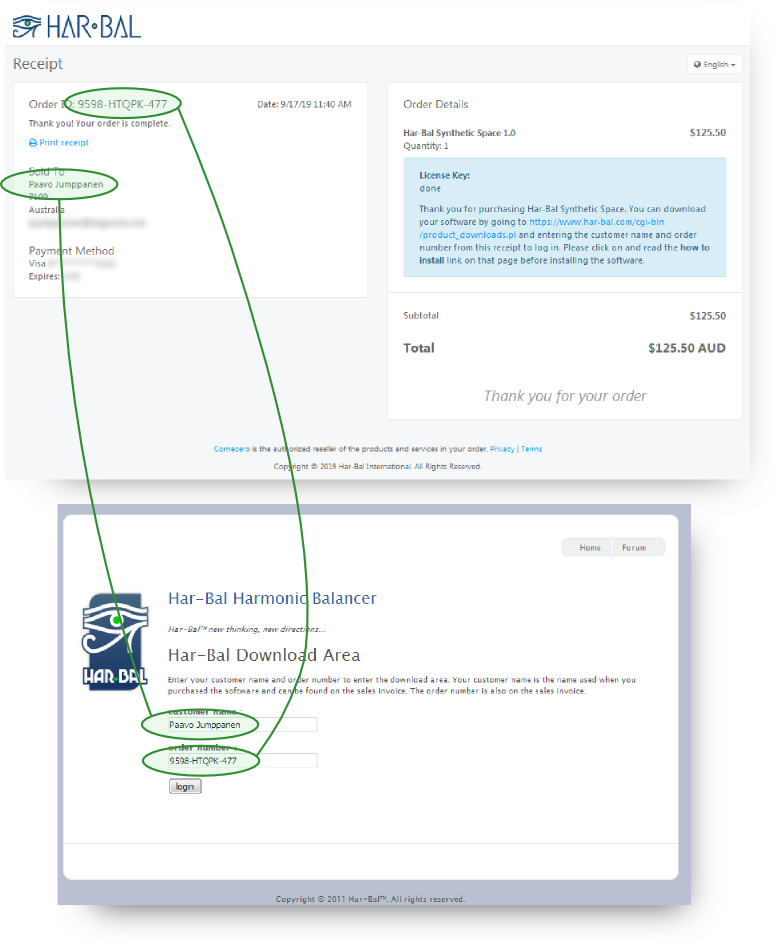
How to login to the downloads pageOn successful login you should see the products you can download, which should include all versions available for all supported platforms. You are free to use any or all of the supported versions. Please note that after making a purchase it may take a few minutes before your purchase is fully processed and until that happens you will not be able to log in. When successful you should see a page like this. 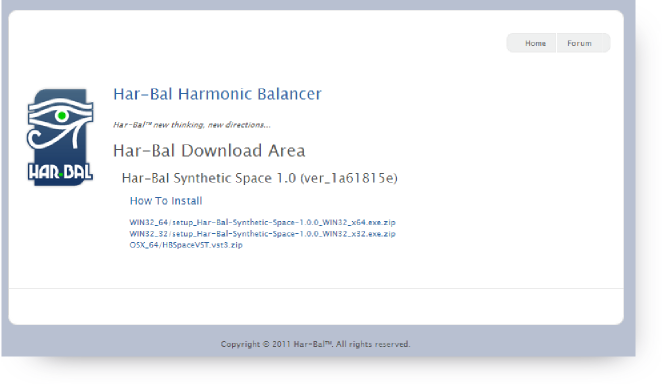
The content of the downloads page when logged inDownload the product appropriate for your operating system and digital audio workstation(DAW). Once the download is complete extract the installer from the zip file and run it to install. When used for the first time in your DAW it will be unlicensed and inactive. To license the plugin first press the Create button on the license form and press the save button on the save as dialog box. This will save the license.html file to disk and open the form in a web browser. If the form does not open you may not have a web browser file association for .html files. In that case simply note where you have saved the license.html file to and open it with a browser manually. If your DAW is on a machine never connected to the internet then save the license.html file to a thumb drive by pressing the save button and transfer it to a machine that is connected to the internet and open it there. Then transfer the license key back to the install machine. 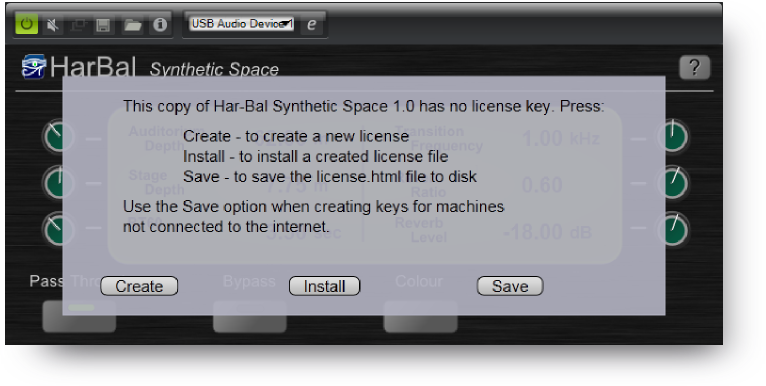
The not licensed dialog boxIn the open request license form copy the the Customer Name and Order Number from your order receipt into the appropriate places and press the request button. A new license key should then be created and downloaded. If downloading fails check your browser or try a different one. The licensing system is known to function properly with Google Chrome and Mozilla Firefox. Also be aware that your computer firewall and or internet security protection may be preventing both the license key download and its installation. In the case of problems you should try disabling internet security during the installation and activation process. 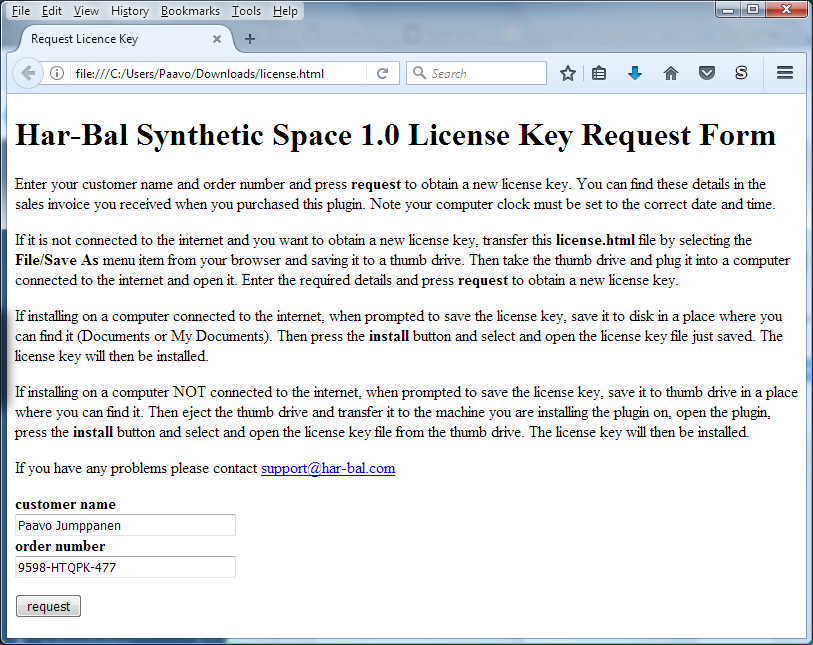
The Request License Key formThe browser will typically prompt whether to open or save the file. Choose to save the file to disk and note where it is saved to and the name of the file. 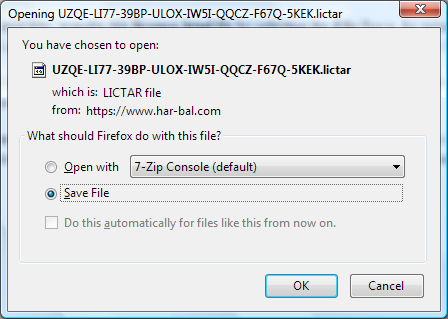
Saving the downloaded license keyThen return to the Har-Bal Synthetic Space unlicensed dialog and press the install button and select the license file you just downloaded. On pressing the Open button the key will be installed and Har-Bal Synthetic Space activated. 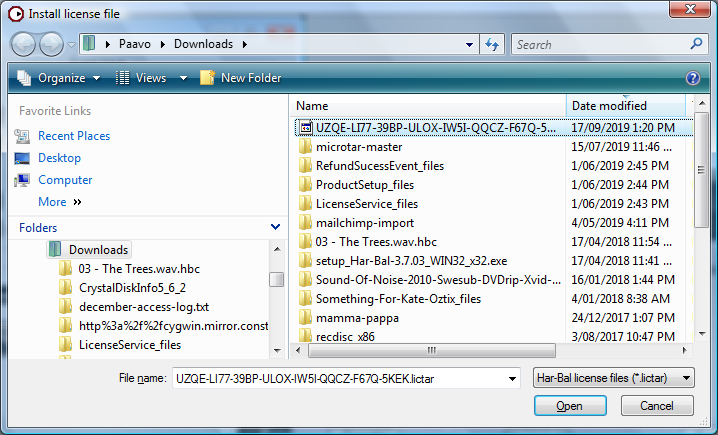
Installing the downloaded license keyControl Panel OverviewThe control panel for Har-Bal Synthetic Space is shown below and comprises the following controls: 1 - Auditorium DepthThis parameter controls the size of the Auditorium and has an adjustment range from 15 metres to 150 metres. An optimal sounding space will have an Auditorium Depth between 50 and 90 metres. Above 90 metres and the reverberation will start sounding stadium like with an obvious echo characteristic. Below 50 metres the start of the reverberation tail will encroach into the late reflection region that can affect comprehension. This parameter is not automatable. 2 - Stage DepthThis parameter controls the space between the stage back wall and the performer. The adjustment range changes depending upon the Auditorium Depth and is variable from 0 metres to one quarter of the Auditorium Depth. Adjusting this parameter will alter the initial delay before early reflections start. This parameter is not automatable. 3 - RT60This parameter controls the time it takes for the reverberation level to drop to a level of 60dB below the direct path sound from the performer and has an adjustment range from 200 milliseconds to 10 seconds. This parameter controls the liveliness of the synthesised space. This parameter is automatable. 4 - Transition FrequencyThis parameter controls the frequency at which the reverberation time transitions from the low frequency case to the high frequency case. It is used in conjuction with Reverb Ratio to control how much faster high frequencies decay in the revererant tail compared with the low frequencies. It has an adjustment range from 100Hz to 10kHz. This parameter is automatable. 5 - Reverb RatioThis parameter controls the relativity between low frequency and high frequency reverb time. Low frequencies have a reverb time corresponding to the value of the RT60 knob whereas high frequencies have a reverb time of the RT60 knob value multiplied by the Reverb Ratio value. It has an adjustment range from 0.05 to 1.0. This parameter is automatable. 6 - Reverb LevelThis parameter controls the overall level of reverberation and has an adjustment range from -35dB to -5dB. The reverberation level parameter is largely decoupled from the other parameters. Normally increasing the RT60 value would result in an increased level of reverberation but Har-Bal Synthetic Space compensates for this growth by automatically reducing the gain to maintain a largely constant reverberation level that approximates the value for this parameter. A good level of reverberation usually lies in the range of -15dB to -20dB. This parameter is automatable. 7 - Pass ThroughThis parameter toggles between the driving signal being passed through and mixed with the reverberation and not being passed through. When used for a channel effect Pass Through will typically be on whereas if being used as an effect on a reverb bus Pass Through will be off. This parameter is automatable. 8 - BypassThis parameter toggles between the the reverberation being passed to the output and not being passed through. This parameter is automatable. 9 - ColourThis button opens the colour editor and alters the colour of the early reflections, and consequently the colour of the entire reverberation. Colour is not automatable. 10 - HelpThis button opens the help documentation for this plugin. 
Control Panel Overview for Har-Bal Synthetic SpaceIt is important to note that the behaviour of the Bypass button may not behave in a manner you might expect but the behaviour is easily understood by referring to the block diagram below. The Bypass button controls the presence or absence of reverberation in the output. The Pass Through button controls whether or not the reverb unit input is passed to the output. With Pass Through off and Bypass on (switch open) there will be no output from the Synthetic Space plugin. 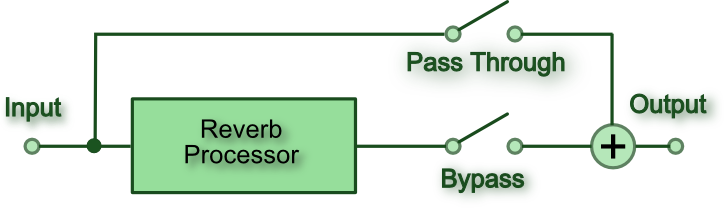
Pass Through and Bypass Block DiagramThe Colour Editor OverviewThe colour editor for Har-Bal Synthetic Space is shown below and comprises the following controls: 1 - Early Reflection Frequency Response GraphThis graph shows the nominal frequency response of the early reflections. This frequency response forms the kernel for synthesising the early reflection impulse responses and controls the colour of the entire reverberation unit. 2 - New Frequency Response Push ButtonPressing this button creates a new blank frequency response as a starting point. Normally the base response is tapered at the high and low frequency ends to improve the intelligibility aspects of the reverberation. If you wish to start with a completely flat frequency response then press and hold the SHIFT button while clicking on this button. 3 - Gain Tool Radio ButtonSelecting this button selects the Gain Tool. The Gain Tool is, in essence, a parametric equalizer. The centre frequency is chosen by moving the mouse cursor to the desired frequency on the frequency response plot and then pressing and holding down the left mouse button. The gain is controlled by moving the mouse up or down and the Q is controlled by moving the mouse left or right. During the dragging operation a preview of the modified frequency response follows the mouse movement. When you release the left mouse button the filter change is made and the frequency response plot updated. 4 - Low Shelf Tool Radio ButtonSelecting this button selects the Low Shelf tool. The Low Shelf tool is similar to the shelving response of a bass tone control without the plateau. The corner frequency is chosen by moving the mouse cursor to the desired frequency on the frequency response plot and then pressing and holding down the left mouse button. The slope is controlled by dragging the mouse up or down. During the dragging operation a preview of the modified frequency response follows the mouse movement. When you release the left mouse button the filter change is made and the frequency response plot updated. 5 - High Shelf Tool Radio ButtonSelecting this button selects the High Shelf tool. The High Shelf tool is similar to the shelving response of a treble tone control without the plateau. The corner frequency is chosen by moving the mouse cursor to the desired frequency on the frequency response plot and then pressing and holding down the left mouse button. The slope is controlled by dragging the mouse up or down. During the dragging operation a preview of the modified frequency response follows the mouse movement. When you release the left mouse button the filter change is made and the frequency response plot updated. 6 - Zoom In Tool Radio ButtonSelecting this button selects the Zoom In tool. Zooming In can be done in two different ways : by clicking or by clicking and dragging a zoom frame. If you click on a specific region then the view is zoomed in by 50% centred upon the point clicked. If clicking and dragging a zoom box, the view is zoomed into the region bounded by the box. 7 - Zoom Out Tool Radio ButtonSelecting this button selects the Zoom Out tool. Zooming out can be done in two different ways : by clicking or by clicking and dragging a zoom frame. If you click on a specific region then the view is zoomed out by 50% centred upon the point clicked. If clicking and dragging a zoom box, the view is zoomed out of the region bounded by the box such that the corners of the view are mapped to the corners of the zoom frame. 8 - Zoom All Push ButtonClicking on the Zoom All button zooms the frequency response graph into full view so that all the graph features are visible. 9 - Close Push ButtonClicking the Close push button closes the Colour Editor dialog box. 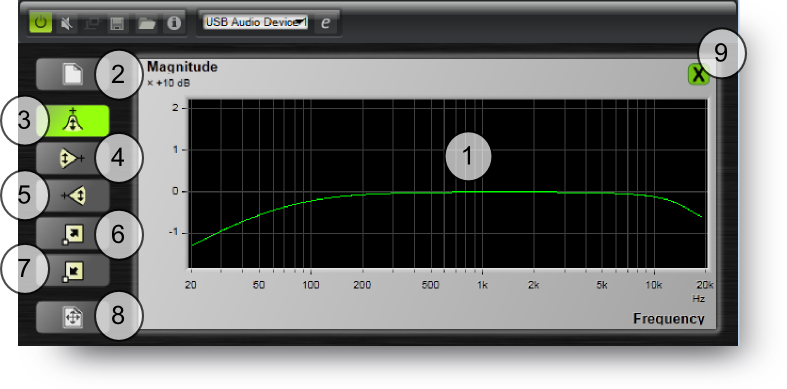
The Colour Editor OverviewUsing Synthetic Space in a Track ContextWhen used in a track effect context you will want the input passed through to the reverb output so Pass Through should be on. This situation is illustrated below. 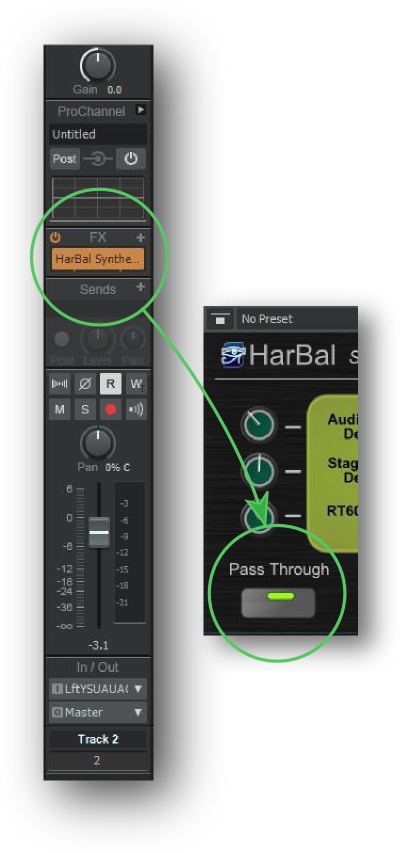
Using Synthetic Space in a Reverb Bus ContextWhen used in a reverb bus context you will not want the input passed through to the reverb output so Pass Through should be off. The bus approach to reverb processing should be used when mixing a composition with many parts in many tracks because it allows the reverberation level for each part to be controlled independently. In this way it is easy to make one part close and another distant simply by changing the send level for the associated track. This situation is illustrated below. 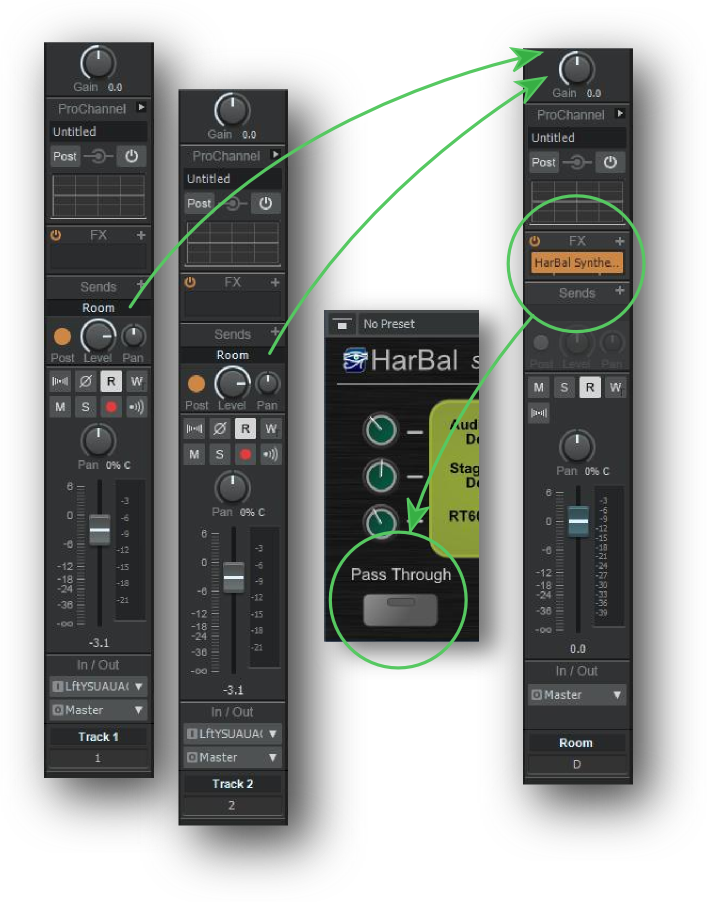
|