Har-Bal Dynamics Processor Help
Har-Bal Dynamics Processor
Har-Bal™ new thinking, new directions…
Welcome to Har-Bal Dynamics Processor, the plugin software that introduces transient limiting and automated delay compensation to the issue of compression.
Manual
Presets
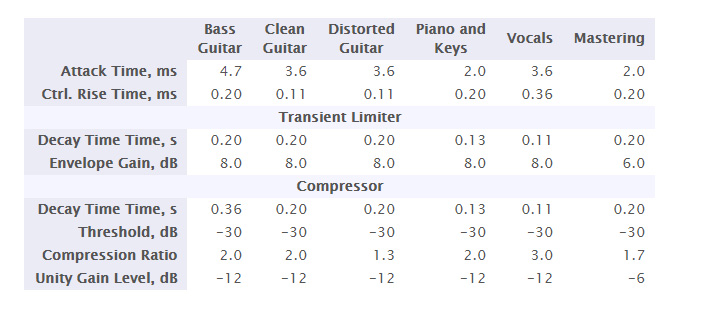
The following presets are installed and available to software that supports Steinberg .vstpreset files and Apple .aupreset files. For other host software that does not recognise these preset files they can be manually recreated from the data provided below. These presets follow a general pattern. The more usable high frequency content the faster the Attack Time and Control Rise Time. The less low frequency distortion required the longer the Decay Time. Hence for a Bass Drum we want a longer delay time to avoid creating too much low frequency distortion.
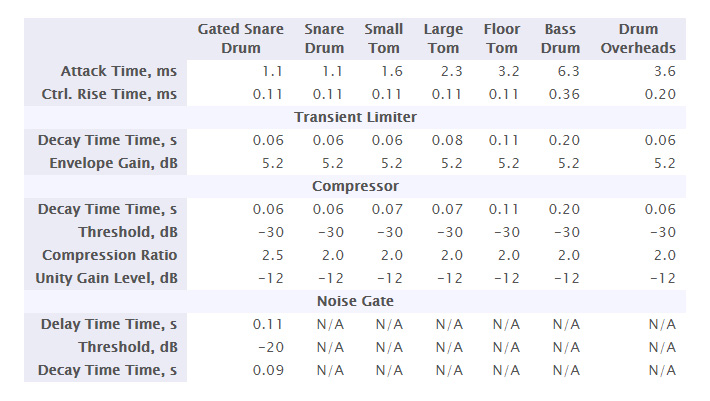
Adjustments of Unity Gain Level and the Noise Gate controls are highly specific to the material being processed and the desired outcome. As such, these figures are either common or not quoted at all. The noise gate figures have been quoted only for the Gated Snare Drum example that illustrates how to obtain a Phil Collins like drum sound. Noise gate settings in more normal applications will depend on the noise level in the source material and the type of music being gated. Users are encourage to experiment to find the most appropriate gate settings for their material.
Downloading and Installing
To download the software after purchase go to the Har-Bal downloads page and log in using the Customer Name and Order Number as it appears on your purchase invoice as shown below. You should save this information in a safe place (the Customer Name and Order Number) as you can use it at any time to download your software and will need it to create new license keys when needed.

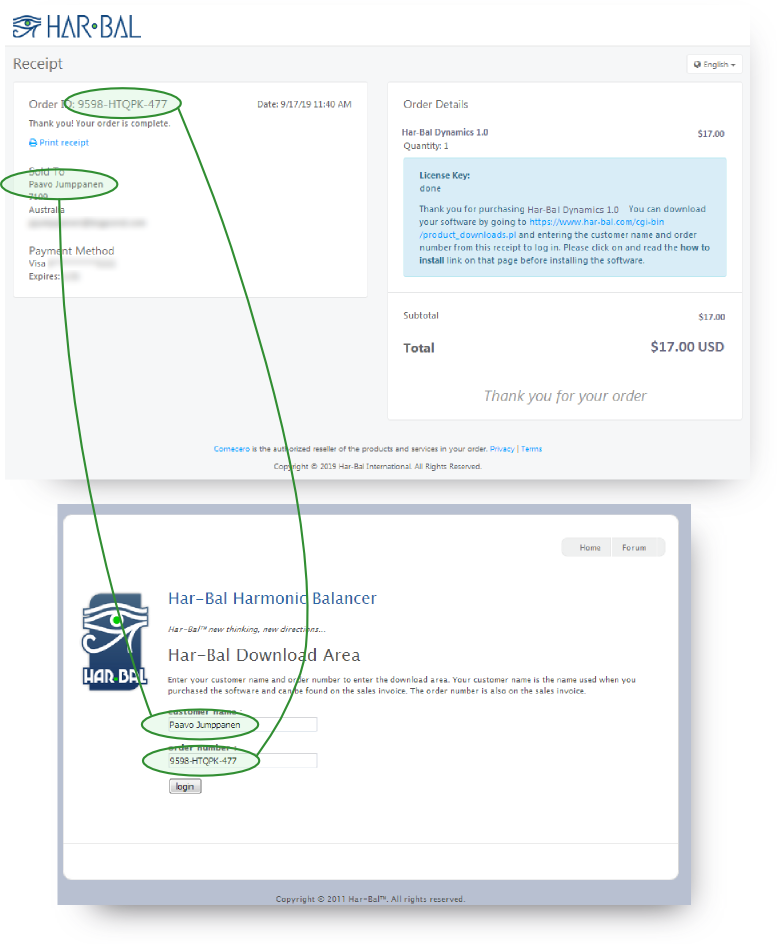
How to login to the downloads page
On successful login you should see the products you can download, which should include all versions available for all supported platforms. You are free to use any or all of the supported versions. Please note that after making a purchase it may take a few minutes before your purchase is fully processed and until that happens you will not be able to log in. When successful you should see a page like this.

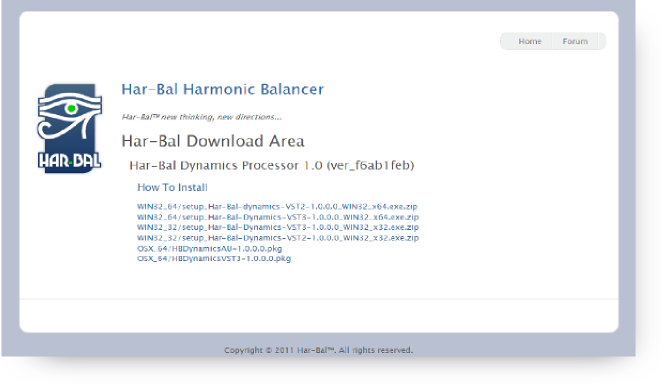
The content of the downloads page when logged in
Download the product appropriate for your operating system and digital audio workstation(DAW). Once the download is complete extract the installer from the zip file and run it to install.
When used for the first time in your DAW it will be unlicensed and inactive. To license the plugin first press the Create button on the license form and press the save button on the save as dialog box. This will save the license.html file to disk and open the form in a web browser. If the form does not open you may not have a web browser file association for .html files. In that case simply note where you have saved the license.html file to and open it with a browser manually. If your DAW is on a machine never connected to the internet then save the license.html file to a thumb drive by pressing the save button and transfer it to a machine that is connected to the internet and open it there. Then transfer the license key back to the install machine.

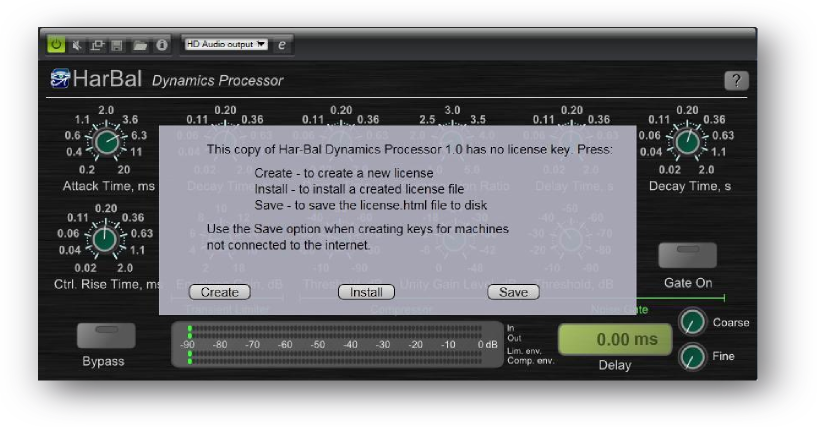
The not licensed dialog box
In the open request license form copy the the Customer Name and Order Number from your order receipt into the appropriate places and press the request button. A new license key should then be created and downloaded. If downloading fails check your browser or try a different one. The licensing system is known to function properly with Google Chrome and Mozilla Firefox. Also be aware that your computer firewall and or internet security protection may be preventing both the license key download and its installation. In the case of problems you should try disabling internet security during the installation and activation process.

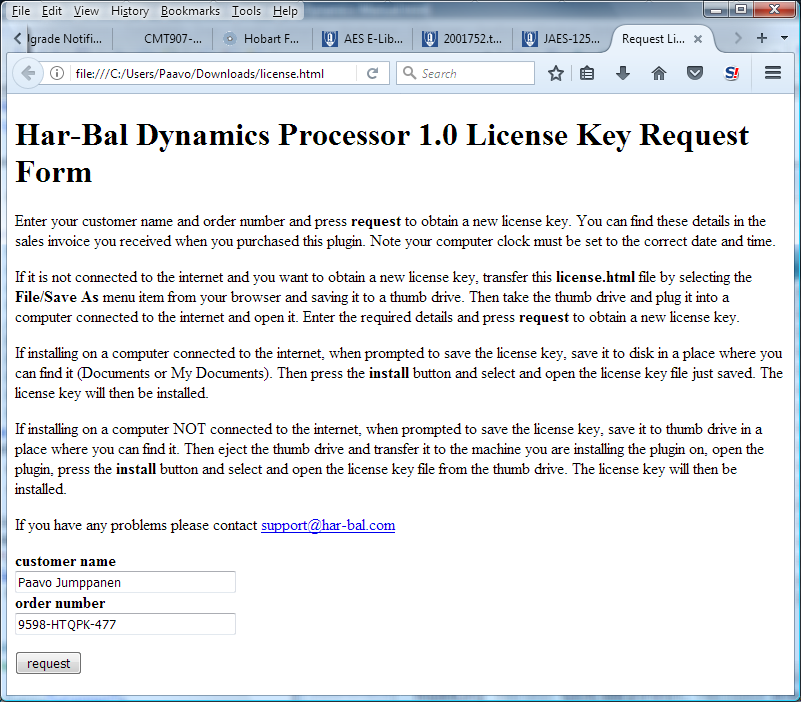
The Request License Key form
The browser will typically prompt whether to open or save the file. Choose to save the file to disk and note where it is saved to and the name of the file.

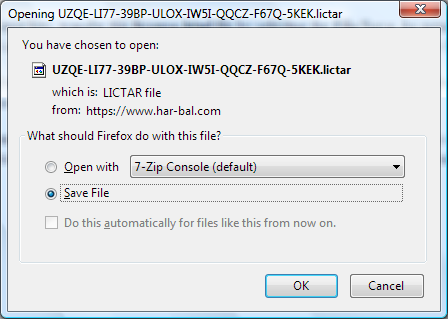
Saving the downloaded license key
Then return to the Har-Bal Dynamics Processor unlicensed dialog and press the install button and select the license file you just downloaded. On pressing the Open button the key will be installed and Har-Bal Dynamics Processor activated.

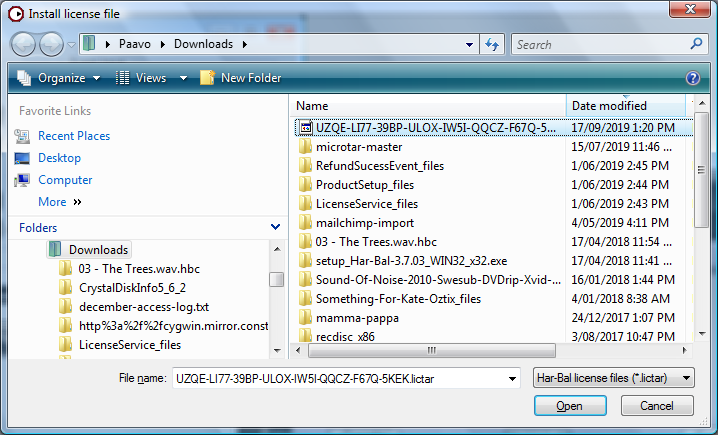
Installing the downloaded license key
Control Panel Overview
The control panel for Har-Bal Dynamics Processor is shown below and comprises the following controls:

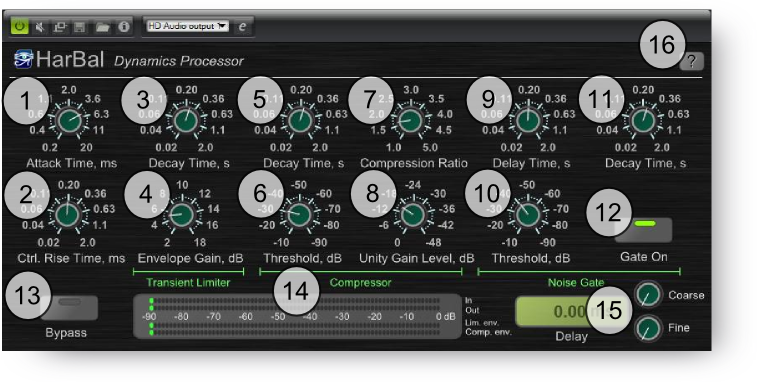
Control Panel Overview for Har-Bal Dynamics Processor
1 – Attack Time
This parameter controls the rise time of the envelope detector which in turn will affect the compressor, transient limiter and noise gate behaviour. Shorter rise times will make the transient limiter threshold more sensitive to short term transients and will reduce the ability to remove transients. This parameter is not automatable.
2 – Control Rise Time
This parameter controls the speed at which the gain control signal can change and affects the sound of transient limiting and dynamic control. The shorter the rise time the dirtier the sound but conversely, too long rise times can result in artifacts arising from too length transient attenuation. This parameter is not automatable.
3 – Transient Limiter Decay Time
This parameter controls the envelope decay time for the transient limiter and will affect how much material is limited. Longer decay times result in list limiting in general and the decay time should optimally be set a length comparable with the decay time of the transient material. This parameter is automatable.
4 – Transient Limiter Envelope Gain
This parameter controls the level of the transient limiter threshold and thus, the amount of limiting. Low gain values result in more limiting and higher gain levels allow more of the transient to pass. This parameter is automatable.
5 – Compressor Decay Time
This parameter controls the envelope decay time for the compressor and will affect how much material is compressed. Shorter decay times result in more compression but conversely more signal distortion with the quality going from dirty to clean with increasing decay time. Choose this value based on the type of sound you desire through compression. This parameter is automatable.
6 – Compressor Threshold
This parameter controls the dynamic range over which compression will occur. For envelope levels below the threshold the compression gain remains constant. Above the threshold the gain will change with input level in accordance with the compression ratio. This parameter is automatable.
7 – Compression Ratio
This parameter controls the compression slope for the compressor input-output transfer function. A value of 1 corresponds to no dynamic compression and a value of 5 corresponds to 1/5 dB change in output level for every 1 dB increase in input level above the compression threshold. This parameter is automatable.
8 – Compressor Unity Gain Level
This parameter controls the envelope level that corresponds to the unity gain condition (when the compression gain is 1). For signal levels above the unity gain level the output will be cut in proportion to the compression ratio and for levels lower than the unity gain level the output will be boosted in proportion to the compression ratio. This parameter is automatable.
9 – Noise Gate Delay Time
This parameter controls the amount of time the noise gate envelope must be below the threshold level for a noise gate event to trigger. This parameter is automatable.
10 – Noise Gate Threshold
This parameter controls the level the noise gate envelope must be below for noise gating to occur. This acts in combination with the Noise Gate Delay Time to control when gating occurs. This parameter is automatable.
11 – Noise Decay Time
This parameter controls the rate of decay of the output gain when a noise gating event occurs. A short time value will result in a sudden cut out of sound whereas a long decay time will result in a gradual fading away. This parameter is automatable.
12 – Gate On Button
This toggle button controls when the noise gate is active. This parameter is automatable.
13 – Bypass Button
This toggle button controls whether the plugin is active. This parameter is automatable.
14 – Level Meters
This level meter displays, from top to bottom, the peak and RMS (1) input level, (2) output level, (3) limiter envelope and (4) compressor envelope.
15 – Delay Controls
These controls allow you to insert a delay in the signal path of up to 50ms in length for the specific purpose of optimally time aligning parts that require it. For example, in multi-mic’ing a drum kit best mixing is possible when the close mic’ed toms and snare are time aligned with the overheads. This parameter is not automatable.
16 – Help
This button opens the help documentation for this plugin.